
Post Processing

In lightroom, do you find yourself repeating the same steps
for all of your images? You know, like
sharpening, color adjustments, etc. After
shooting with my Nikon for so many years, I’ve noticed there are several
adjustments that I make to each image BEFORE I really start editing. To save myself some time, I created a profile
unique to my Nikon D90 as a starting spot for my editing process. To do this you simply choose a photo in the
Develop Module, then make those adjustments.
I always start with the Lens Correction Tab and enable profile
corrections and remove Chromatic Aberration.
Then I move to the Detail Tab and adjust
to this:

Next is the HLS/Color Tab. I don’t care for “neon” greens so I adjust
the Green Hue to +5, the Green Saturation to -25 and the Green Luminance to
-16. This is all based on your personal preference.
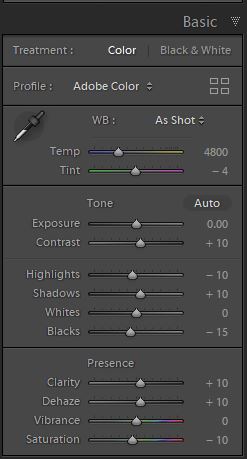
I shoot Kelvin White Balance so in the Basic Panel I set the
WB to “As Shot” and make adjustments with the WB tool if necessary. I like contrast in my
images so I increase contrast, decrease highlights and increase shadows, and
decrease the blacks. Since I shoot still
life, I like nice crisp shots, so I increase the clarity slightly and add a
touch of dehaze. I also like slightly
muted tones in my shots so I reduce saturation overall slightly.
Once you have your settings where you want them, in the
Develop Module choose Develop from the Menu and then Set Default
Settings. Click Update to Current
Settings and you’re done. Whew….that
seems like a lot of work, but it really saves time when editing.
Now you can begin the creative side of your editing. This particular image is extremely underexposed.

In LR I increased the exposure and added a
little more contrast and clarity. I shot
this using a high ISO so I also increased the color noise reduction to +25 in
the detail tab. I cropped to a 4 x 5
ratio using the rule of thirds. Now I’m
ready to take it into Photoshop for some final adjustments.

So obviously with this photo, I wasn’t paying all that great
attention to my background ☹. In PS I used the “Content Aware Fill Tool”
and the Clone Stamp to fix that.

Just as with LR, there are adjustments I make to my images in PS. I like to emphasize the light in
the photo so I always add an overlay from Jessica Drossin’s Lightscaping Overlays called Awakening. Once this is
placed and adjusted to where I want the light in the image, I change the blend
mode to soft light. Sometimes this overlay
adds too much yellow so I add a Hue/Saturation layer, pin it to the overlay so that it is the only layer
affected, and reduce the saturation.
Next I duplicate the background layer, make it a smart
object and apply a high pass filter.
This adds a bit more sharpness to the photo. The reason I make it a smart object is to
have control over the amount of sharpening.
I can double-click on the layer and adjust the amount of the radius of
the high pass filter.
In some cases, adding “awakening” to the photo eliminates
shadows (which I love in my shots). If
that is the case I add a Curves Adjustment Layer and pull down the midpoint
slightly. This adds depth to the image.

My final adjustment is a Curves Adjustment Layer to mute the
blacks. I love that slight “filmy” look
to my images and I find this is the best way to produce that.

Once I’m satisfied with the image, I save it
back into LR where I export the final image to a .jpg file for posting or
printing.

So there you have it…..my editing process in a nutshell. 😊 If you made it all the way through that thanks for hanging. I’d
love to hear from you about your editing process. Please leave me a note in the comments section.


0 Comments